October 10, 2026
Designing an API Rate Limiter
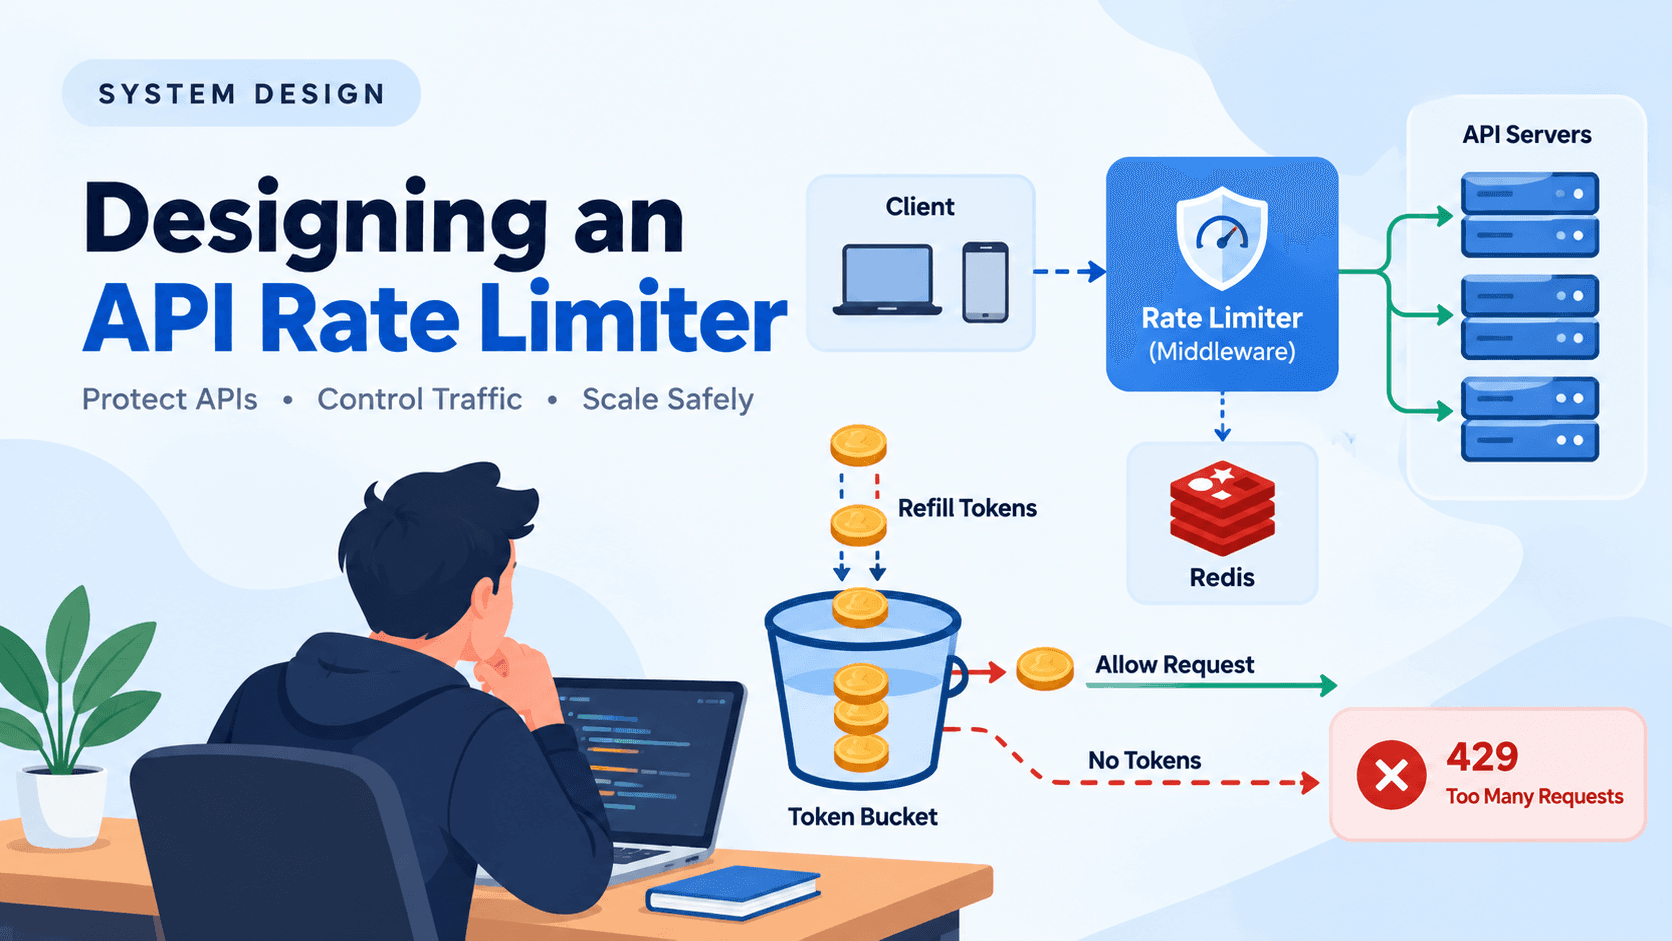
When you build an application, your API receives requests from users, mobile apps and other services. But what happens when too many requests arrive at the same time?
Your servers may become overloaded, response times may increase and legitimate users may experience errors.
This is where an API rate limiter becomes useful.
In this guide, we will learn what rate limiting is, why it matters and how different algorithms work. We will also explore a simple architecture using middleware and Redis, with practical examples for beginners.
What Is an API Rate Limiter?
An API rate limiter controls how many requests a user, client, or service can make within a specific period.
For example, imagine your application allows a user to make five login attempts per minute.
The first five requests may be allowed. If the user sends another request before the applicable limit resets, the rate limiter can reject it.
This helps protect your application from excessive traffic and unnecessary resource consumption.
Rate limiting is commonly used for login endpoints, payment APIs, messaging services, account creation, and other operations that need traffic control.
Why Do We Need Rate Limiting?
Imagine you have an e-commerce application running on AWS.
Normally, a few hundred users browse your products. Suddenly, a bot starts sending thousands of requests to your product API every second.
Without proper controls, your application servers and database may struggle to handle the traffic.
An API rate limiter helps address this problem in several ways.
1. Protect application resources
It prevents individual clients from making unlimited requests and helps reduce the impact of abusive traffic.
2. Reduce unnecessary costs
Some external APIs charge based on the number of requests. Rate limiting can help control usage and avoid unexpected expenses.
3. Improve service stability
By controlling incoming traffic, rate limiting helps preserve resources for legitimate users.
Rate limiting is one layer of protection; it does not replace other security measures or comprehensive DDoS protection.
Where Should We Implement a Rate Limiter?
A rate limiter can be implemented directly in the backend application or in a middleware layer, such as an API gateway.
For example, consider this request flow:
Client → Rate Limiter → API Servers
When a request arrives, the rate limiter checks whether it should be allowed. If the request passes the configured rule, it continues to the backend.
If the limit has been exceeded, the request can be rejected before reaching the application server.
For a small Node.js application, you might implement rate limiting using Express middleware. For a larger system, you could use a shared rate-limiting service or an API gateway.
The right choice depends on your architecture, traffic volume, and operational requirements.
Understanding HTTP 429: Too Many Requests
Have you ever seen an API return a 429 Too Many Requests response?
This status code indicates that the client has exceeded an applicable request limit.
For example, suppose your API allows 100 requests per minute. If a client exceeds that limit, the API may return:
HTTP/1.1 429 Too Many Requests
Retry-After: 30
The Retry-After header tells the client to wait 30 seconds before retrying.
A client should handle this response gracefully instead of immediately sending more requests.
Cloudflare also documents rate-limit responses and retry information for its APIs. Read the official rate-limit documentation.
The Five Popular Rate-Limiting Algorithms
Different algorithms handle incoming requests in different ways. Understanding their differences helps you choose an appropriate approach for your application.
1. Token Bucket Algorithm
Imagine a bucket that contains tokens.
Every incoming request needs one token. The system adds new tokens at a configured rate, but the bucket has a maximum capacity.
If a token is available, the request is allowed. If the bucket is empty, the request is rejected until tokens become available again.
Example:
Suppose your API uses these settings:
Bucket capacity: 4 tokens
Refill rate: 2 tokens per second
Cost per request: 1 token
The bucket starts with four tokens, allowing four requests to pass immediately. Additional requests must wait for tokens to be replenished.
The bucket never holds more than four tokens.
When should you use it?
Token Bucket is useful when an API should allow occasional bursts of requests while controlling the longer-term request rate.
For example, a dashboard may send several requests when a user first opens it, followed by very little activity.
Its main advantage is flexibility. However, choosing the correct bucket size and refill rate requires careful consideration.
2. Leaky Bucket Algorithm
The Leaky Bucket algorithm uses a queue to control how quickly requests are processed.
Imagine water entering a bucket through the top and leaving through a small hole at the bottom. Even if water enters quickly, it leaves at a more controlled rate.
In software, incoming requests enter a queue and are processed at a configured rate.
Example:
Suppose your service receives 100 requests in one second, but your processing system handles only 10 requests per second.
The requests can wait in a bounded queue and be processed gradually. If the queue becomes full, additional requests are rejected.
When should you use it?
Leaky Bucket is useful when you need a steady processing rate. Its disadvantage is that a full queue can cause newer requests to be rejected while older requests are still waiting.
3. Fixed Window Counter
The Fixed Window Counter divides time into fixed intervals and counts requests within each interval.
For example, an API allows three requests per second.
The counter resets at the beginning of each new second.
The first three requests are allowed, while additional requests within that same window are rejected.
The main problem: traffic bursts at window boundaries.
Suppose an API allows five requests per minute. A user sends five requests just before the minute ends and five more just after the next minute begins.
The system may allow ten requests within a very short period because the counter has reset.
When should you use it?
Fixed Window Counter is simple and memory-efficient. It can be a good choice when occasional boundary bursts are acceptable.
4. Sliding Window Log
Sliding Window Log tracks the timestamps of individual requests.
Instead of resetting a counter at a fixed time boundary, the algorithm examines requests made during the most recent time window.
Example:
Suppose an API allows two requests per minute.
A user sends requests at 10:00:01 and 10:00:30. A third request arrives at 10:00:50.
Because two requests already fall within the current one-minute window, the third request is rejected.
As time passes, old timestamps are removed from the window, allowing new requests when the limit permits.
When should you use it?
This algorithm is useful when accurate rolling-window limits are important.
Its disadvantage is memory usage because the system needs to track request timestamps. At high traffic volumes, this can become expensive.
5. Sliding Window Counter
Sliding Window Counter combines the simplicity of fixed windows with an estimate of traffic across a rolling window.
It uses counters from the current and previous windows rather than storing every request timestamp.
Example:
Suppose your API allows seven requests per minute.
Previous minute: five requests
Current minute: three requests
Current time: 30% into the current minute
The previous window overlaps the rolling window by approximately 70%.
The estimated request count is:
3 + (5 × 0.7) = 6.5
This estimate helps the rate limiter decide whether another request should be allowed.
When should you use it?
Sliding Window Counter is useful when you want smoother rate limiting without storing every request timestamp.
It is an approximation, so it may not enforce a rolling-window limit as precisely as Sliding Window Log.
Comparing the Five Algorithms
Each rate-limiting algorithm has its own advantages and limitations. The best choice depends on your application's requirements.
| Algorithm | Main advantage | Main limitation |
|---|---|---|
| Token Bucket | Allows controlled bursts | Requires tuning bucket capacity and refill rate |
| Leaky Bucket | Smooths request processing | Requests can be rejected when the queue is full |
| Fixed Window Counter | Simple and memory-efficient | Can allow bursts at window boundaries |
| Sliding Window Log | Accurate rolling-window counting | Higher memory usage |
| Sliding Window Counter | Efficient with smoother limits | Uses an approximate request count |
Which Algorithm Should You Choose?
There is no universally best algorithm. Token Bucket is a good choice when occasional traffic bursts are acceptable, while Sliding Window Log is suitable when precise rolling-window limits are important.
How Redis Helps Implement Rate Limiting
In a large application, several API servers may receive requests from the same user.
If every server maintains its own independent counter, the user might exceed the intended limit by sending requests to different servers.
A shared data store can help solve this problem.
Redis is commonly used for rate-limiting state because it provides fast in-memory operations and supports expiration of keys.
Two useful Redis commands are:
INCR: Increments a counter.EXPIRE: Sets a time-to-live for a key.
Example:
Imagine your login API allows five attempts per minute.
A Redis counter might look like this:
rate_limit:login:user_123 = 3This represents three recorded attempts for that user within the relevant window.
A simplified rate-limiting flow looks like this:
A request reaches the rate-limiting middleware.
The middleware identifies the relevant user or client.
It checks the shared counter.
It determines whether the request is allowed.
If allowed, the request continues to the API server.
If the limit is exceeded, the middleware returns a
429response.
In production, the counter update, expiration, and limit check must be designed carefully to handle concurrent requests correctly.
Designing a Distributed Rate Limiter
A distributed system may have several API servers and several rate-limiter instances.
This introduces two important challenges.
Race conditions
Imagine the counter is currently three and the limit is five.
Two requests arrive at almost exactly the same time. Both read the counter before either updates it.
If the check and increment are not performed atomically, the requests may make decisions using outdated counter values.
Redis Lua scripts or other suitable atomic operations can help prevent this problem.
Shared state
If different rate-limiter instances maintain separate counters, they may disagree about how many requests a user has made.
Using a shared store such as Redis helps them coordinate their decisions.
However, a distributed rate limiter must also consider Redis failures, network latency, concurrency, and the consistency requirements of the application.
Monitoring and Improving a Rate Limiter
After implementing rate limiting, you should monitor whether the rules are working as expected.
Useful metrics include:
Number of successful requests
Number of rate-limited requests
API response latency
Redis latency and errors
Rate-limit behavior during traffic spikes
For example, if many legitimate users receive 429 responses, your rules might be too strict.
If a sudden traffic spike overwhelms the application, you may need to adjust your configuration or select an algorithm that better supports bursts.
You should also decide what happens if the rate limiter or Redis becomes unavailable. The appropriate fallback depends on the endpoint: a sensitive login or payment operation may need stricter protection than a low-risk read-only endpoint.
Conclusion
An API rate limiter is an important part of designing reliable backend systems. It controls request frequency, protects application resources, and helps services remain stable under heavy traffic.
The five main algorithms Token Bucket, Leaky Bucket, Fixed Window Counter, Sliding Window Log, and Sliding Window Counter offer different tradeoffs between flexibility, accuracy, memory usage and processing behavior.
Redis can help maintain shared rate-limit state across multiple API servers, while middleware or an API gateway can enforce limits before requests reach the backend.
If you are learning system design, start by understanding how each algorithm works and what problem it solves. Then explore a simple implementation using Node.js and Redis.
The goal is not to memorize every algorithm. It is to understand the tradeoffs and choose an approach that fits your system's needs.